

Yes, you can transfer WordPress to Webflow. The process involves exporting content and manually rebuilding your site.
Transferring your website from WordPress to Webflow can be a strategic move. Webflow offers a more visual and intuitive approach to web design. Unlike WordPress, Webflow allows for greater customization without extensive coding knowledge. This makes it ideal for designers and developers who want more control over their site’s appearance and functionality.
The process involves exporting your WordPress content, such as blog posts and images, and then manually rebuilding your site in Webflow. While this may seem daunting, the benefits of enhanced design flexibility and a streamlined user experience often outweigh the initial effort. Webflow also provides robust hosting and SEO features, making it a worthy alternative.
Preparation
Transferring your WordPress site to Webflow requires careful planning. Proper preparation ensures a smooth transition. Follow these steps to get ready.
Backup Your WordPress Site
Before you start, create a complete backup of your WordPress site. This includes your database and all files. You can use plugins such as UpdraftPlus or BackWPup for this task.
- Install a backup plugin from the WordPress plugin directory.
- Configure the plugin to backup your site files and database.
- Save the backup file to a secure location.
Backing up protects your data. If anything goes wrong, you can restore your site from the backup.
Review Webflow Requirements
Check the requirements for Webflow to ensure compatibility. Webflow has specific needs for content and design.
| Requirement | Details |
|---|---|
| Content | Export your WordPress content in XML format. |
| Design | Rebuild your design manually in Webflow. |
| Hosting | Webflow offers hosting services. Choose a suitable plan. |
Ensure your content and design meet Webflow’s standards. This step avoids issues during the transfer process.
Setting Up Webflow
Setting up Webflow is simple and user-friendly. You can transition from WordPress to Webflow with ease. Below are the steps to get started with Webflow.
Create A Webflow Account
First, you need to create an account on Webflow. Follow these steps:
- Visit Webflow’s website.
- Click on the “Get Started” button.
- Fill in your email and other details.
- Verify your email address.
Your account is now ready. You can start building your site.
Choose A Template
Next, you need to choose a template. Webflow offers many templates. Follow these steps:
- Go to your Webflow dashboard.
- Click on “New Project”.
- Browse through the available templates.
- Select the one that fits your needs.
- Click on “Use Template”.
You can now start customizing your template.
Webflow’s templates are highly customizable. You can change colors, fonts, and layouts. This helps you create a unique website.
Exporting Content From WordPress
Exporting content from WordPress is a key step when transferring to Webflow. This process ensures your valuable content is safely moved.
Export WordPress Xml File
First, you need to export the WordPress XML file. This file contains your posts, pages, comments, categories, tags, and more.
- Log in to your WordPress dashboard.
- Navigate to Tools > Export.
- Select the content you want to export.
- Click on the Download Export File button.
This action will download an XML file to your computer. This file is essential for importing content into Webflow.
Save Media Files
Next, you need to save your media files. These include images, videos, and other media attached to your posts and pages.
- Go to your WordPress media library.
- Select the media files you want to save.
- Download them to your local drive.
It’s important to have these files accessible for your Webflow import. You might need a file manager plugin to download all files at once.
| Task | Steps |
|---|---|
| Export XML File |
|
| Save Media Files |
|
Importing Content To Webflow
Transferring your WordPress site to Webflow involves several steps. One key step is importing your existing content. This process ensures your blog posts, pages, and media files remain intact. Webflow’s intuitive tools make this process seamless. Below, we’ll break down the steps to help you import your content efficiently.
Use Webflow’s Cms
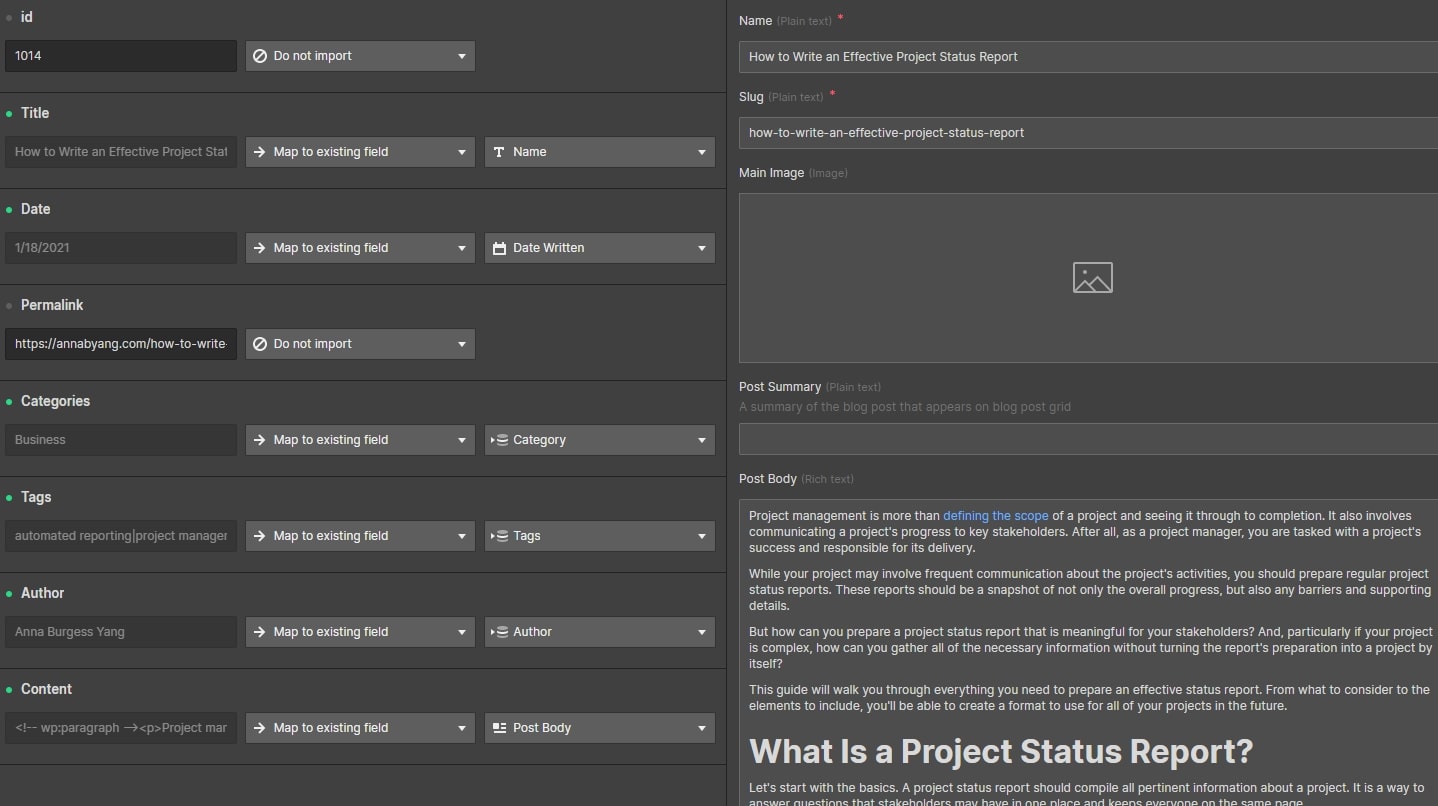
Webflow’s CMS is powerful and user-friendly. Follow these steps to import your WordPress content:
- Export WordPress Content: Go to your WordPress dashboard. Navigate to Tools > Export. Select the content you wish to export. Download the XML file.
- Import to Webflow: Open your Webflow project. Go to the CMS Collections panel. Click Import and upload your XML file.
- Map Fields: Webflow will prompt you to map WordPress fields to Webflow fields. Ensure each field matches correctly.
- Review & Import: Review the mapped fields. Click Import to finalize.
This process transfers your blog posts and pages into Webflow’s CMS.
Upload Media Files
Media files include images, videos, and other files. Here’s how to upload them:
- Export Media Files: In WordPress, go to Tools > Export. Choose Media and download the files.
- Upload to Webflow: Open your Webflow project. Navigate to the Assets panel. Click the Upload button and select your media files.
Webflow will store these files for use in your new site.
By following these steps, your content and media files will move smoothly from WordPress to Webflow.
Design And Customization
Transferring your WordPress site to Webflow can open up new design possibilities. With Webflow, you can achieve greater design flexibility and customization. This section will cover how to recreate layouts and customize styles and themes in Webflow.
Recreate Layouts In Webflow
Recreating your WordPress layouts in Webflow can be straightforward. Webflow offers a visual editor that lets you drag and drop elements. This makes it easy to build complex layouts without coding.
Follow these steps to recreate your layouts:
- Start by sketching your existing layout.
- Use Webflow’s grid system to structure the layout.
- Drag and drop elements like headers, images, and text blocks.
- Adjust spacing and alignment to match your original design.
Webflow’s visual editor is intuitive. It allows you to see changes in real-time.
Customize Styles And Themes
Customizing styles and themes in Webflow offers endless possibilities. With Webflow, you can control every aspect of your site’s appearance.
Here’s how to get started:
- Global Styles: Use global classes to maintain consistency.
- Custom Fonts: Upload custom fonts to match your brand.
- Color Scheme: Define a color palette for your site.
- Animations: Add animations to enhance user experience.
Webflow’s style panel allows you to tweak CSS properties without code. This lets you create unique, branded sites effortlessly.
Webflow also supports CSS grid and flexbox. This helps in creating responsive designs that look great on all devices.
Testing And Optimization
After transferring your website from WordPress to Webflow, it’s time to focus on testing and optimization. Ensuring everything runs smoothly and efficiently is crucial. This process includes checking for broken links and optimizing for SEO.
Check For Broken Links
Broken links can ruin the user experience. They can also hurt your site’s SEO. Follow these steps to check for broken links:
- Use Webflow’s built-in tools to find broken links.
- Fix any broken links by updating URLs or removing outdated pages.
- Test your site on different devices to ensure all links work.
Ensuring all links are functional keeps your visitors happy. It also maintains your site’s SEO ranking.
Optimize For Seo
Optimizing your site for SEO is vital. It helps you rank higher in search engines. Follow these tips:
- Use keywords naturally in your content.
- Ensure your site loads quickly.
- Optimize images with alt text and proper file names.
- Use descriptive, keyword-rich titles and meta descriptions.
- Create a clean, easy-to-navigate site structure.
Here’s a simple table to summarize key SEO tasks:
| SEO Task | Action |
|---|---|
| Keyword Usage | Integrate keywords naturally |
| Site Speed | Minimize load times |
| Image Optimization | Use alt text and proper names |
| Titles & Meta Descriptions | Include keywords |
| Site Structure | Create a clean navigation |
These steps will boost your site’s performance. They also improve your search engine ranking.
Launch And Post-launch Steps
After transferring your WordPress site to Webflow, the launch phase begins. This phase ensures your new site is live and functioning correctly. Post-launch steps help maintain and optimize your site for the best performance. Below are the essential steps to follow.
Connect Your Domain
Connecting your domain to Webflow is crucial. Here’s a simple guide:
- Log in to your Webflow account.
- Navigate to the project settings.
- Select the hosting tab.
- Click on add custom domain.
- Enter your domain name and follow the prompts.
Ensure your domain’s DNS settings are updated. This may take up to 48 hours. Test your domain to verify it’s connected correctly.
Monitor Site Performance
After launching, it’s important to monitor your site’s performance. Use Webflow’s built-in tools and other external tools like Google Analytics. Key metrics to track include:
| Metric | Description |
|---|---|
| Load Time | How quickly your site loads. |
| Traffic | Number of visitors to your site. |
| Bounce Rate | Percentage of visitors leaving after one page. |
Regularly check these metrics to ensure your site is performing well. Make necessary adjustments based on the data.
Common Issues And Solutions
Transferring your website from WordPress to Webflow can be challenging. You might encounter various issues. Below are common problems and their solutions.
Handling Import Errors
Import errors are common during the transfer process. These errors can occur due to various reasons.
- File size limitations
- Incompatible file formats
- Server timeouts
To fix these errors, you can use these steps:
- Ensure the file size is within the acceptable limit.
- Convert files to compatible formats.
- Use a reliable internet connection to avoid timeouts.
Following these steps can help minimize import errors.
Managing Seo Transitions
SEO transitions are crucial during the transfer. You don’t want to lose your search rankings. Here are a few tips:
| Issue | Solution |
|---|---|
| Broken Links | Use 301 redirects to retain link juice. |
| Meta Descriptions | Manually transfer meta descriptions to maintain SEO. |
| Image Alt Text | Ensure all images have alt text for SEO. |
These steps can help maintain your website’s SEO integrity.
Frequently Asked Questions
How Do I Transfer WordPress To Webflow?
To transfer WordPress to Webflow, export your content from WordPress. Then, import it into Webflow using their CMS import feature.
Is It Hard To Migrate From WordPress To Webflow?
Migrating from WordPress to Webflow can be straightforward. Export your content, then import it into Webflow’s CMS. Follow Webflow’s guide.
Can I Keep My WordPress Url In Webflow?
Yes, you can keep your WordPress URL. Set up your Webflow site, then point your domain to Webflow.
Do I Need Coding Skills To Use Webflow?
No, you don’t need coding skills for Webflow. Webflow offers a visual editor, making it user-friendly for non-developers.
Conclusion
Transferring from WordPress to Webflow can streamline your website management. It’s a seamless process with the right tools. Embrace Webflow’s flexibility and design capabilities for a more dynamic online presence. Make the switch today and enhance your digital experience. Transitioning can elevate your website’s performance and user engagement.